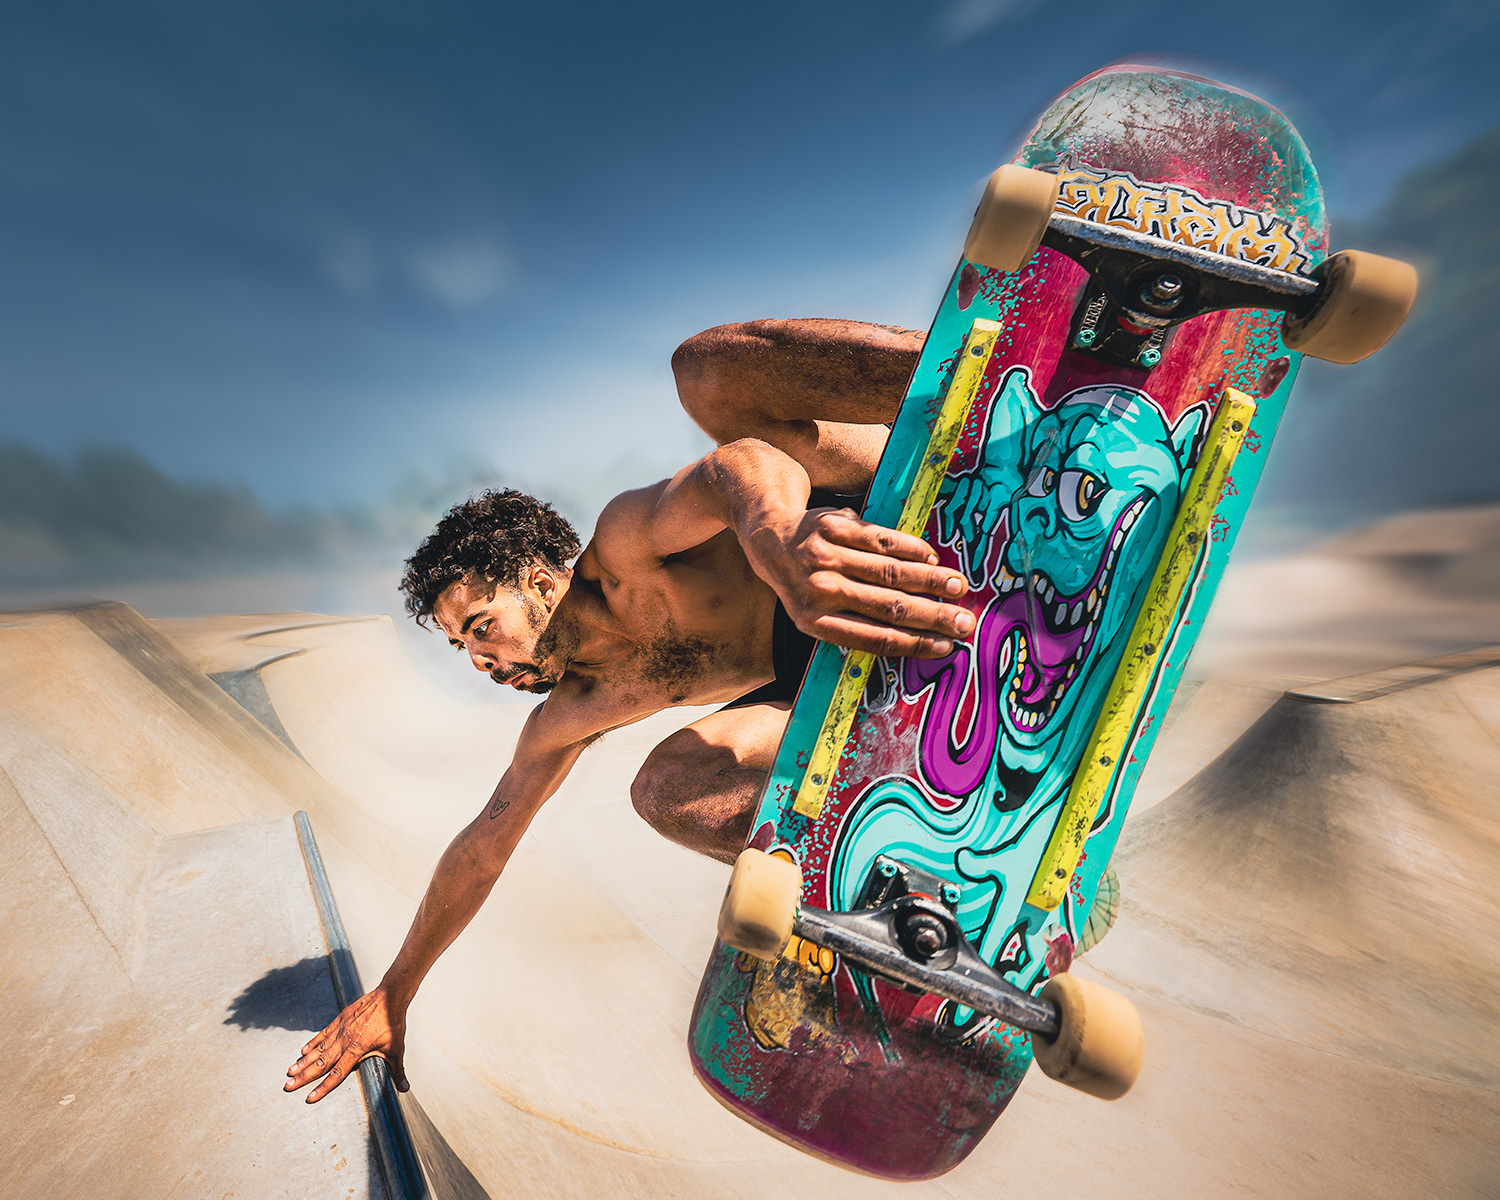
Settings: F8, 1/1000 sec, ISO 100 @18mm - 1 x Speed Light
Skateboarding is more than just a sport; it's an adrenaline-pumping dance of gravity, skill, and passion. Those who've witnessed a skateboarder in action understand the thrill, the excitement that fills the air as they perform gravity-defying tricks. But as a photographer, how can you capture these heart-pounding moments and preserve them in the form of a perfect action shot? In this comprehensive guide, we're going to break it all down for you - from the essential techniques to the right gear and creative strategies. By the end, you'll be well-equipped to capture the essence of skateboarding and freeze the thrill in your photographs.
Unleash Your Inner Skateboarder
Before we dive into the technical aspects of capturing the perfect skateboard action shot, let's start with a piece of advice that transcends equipment and technique: empathy. To capture the essence of skateboarding, you need to understand it from the skater's perspective. You must feel the wind in your face, sense the adrenaline surging through your veins, and anticipate every twist and turn. So, start by immersing yourself in the world of skateboarding. Ride a skateboard, learn a few tricks, and gain an appreciation for the sport. The better you understand the skater's mindset, the more authentic your photos will be.
The Basics of Skateboarding Photography
Now that you've got a feel for skateboarding, let's get into the nitty-gritty of capturing those action shots. There are several foundational elements to consider before you even hit the streets or the skate park.
1. Camera and Lens Selection
Your choice of camera and lens is crucial. Ideally, a DSLR or mirrorless camera will give you the control and image quality you need. Invest in a fast lens, such as a prime with a wide aperture (e.g., f/2.8 or lower), to allow for better low-light performance and background blur. The right lens can make all the difference in isolating your subject against a dynamic background.
2. Shutter Speed
Skateboarding is all about speed and motion. To freeze these moments, you'll want a fast shutter speed. A minimum of 1/1000th of a second is a good starting point, but don't be afraid to go even faster, especially if you're shooting in bright conditions. Fast shutter speeds will eliminate motion blur and ensure crisp, sharp images.
3. Aperture Settings
While a wide aperture is excellent for isolating your subject, you'll also need to consider depth of field. For a balanced look, try an aperture setting of around f/4 to f/8, which allows you to keep both the skater and the surroundings in focus.
4. ISO and Lighting
In skateboarding photography, you often find yourself shooting in a variety of lighting conditions. To combat this, set your ISO to auto, allowing your camera to adjust for changing light. Just make sure not to let it go too high, as this can introduce unwanted noise in your images.
Using Flash for Skateboard Action Photography
Flash photography can significantly enhance your skateboard action shots, adding drama, sharpness, and a professional touch that natural light alone might not achieve. Below is a comprehensive guide on why and how to use flash when photographing skateboarders, covering equipment, settings, timing, and flash placement.
Why Use Flash for Skateboard Photography?
Using a flash in skateboard photography offers several advantages:
1. Freezing Motion: Flash allows you to freeze the motion of fast-moving skateboarders, capturing crisp and detailed images. This is particularly useful in low-light conditions where a faster shutter speed might not be possible without introducing noise or blur.
2. Highlighting the Subject: A flash can help to isolate the skateboarder from the background, making them the clear focal point of the image. This can add a dramatic effect, especially in environments with cluttered or distracting backgrounds.
3. Adding Drama and Depth: Using a flash can create strong contrasts, deep shadows, and highlights that add depth and drama to your shots. This is especially effective in capturing the intensity and energy of the skateboarding action.
4. Enhancing Details: The flash can bring out textures and details in both the skateboarder’s attire and the skateboard itself, which might otherwise be lost in ambient light.
What Equipment to Use
For flash photography in skateboarding, you will typically need:
1. Speedlight/Speedflash: A portable, external flash unit with adjustable power settings. A high-speed sync (HSS) capable flash is ideal for action photography, allowing you to use faster shutter speeds.
2. Triggers and Receivers: Wireless triggers are essential for off-camera flash setups, allowing you to place your flash unit(s) anywhere around the skate spot while controlling them from your camera.
3. Modifiers: Light modifiers such as diffusers, softboxes, or reflectors can help soften the light or control the spread, depending on the effect you want to achieve.
Flash Settings
Here are some general settings to start with:
1. Manual Mode: Use your flash in manual mode to have full control over the light output. Start with the flash power set to 1/4 or 1/2 and adjust as needed.
2. Shutter Speed: Use a shutter speed of around 1/200s to 1/250s if your flash doesn’t support high-speed sync. If you have HSS, you can go higher to freeze faster motion.
3. Aperture: Set your aperture based on the desired depth of field and ambient light conditions. A wider aperture (e.g., f/2.8) will give you a shallower depth of field and more ambient light, while a narrower aperture (e.g., f/8) will increase sharpness and flash effect.
4. ISO: Keep your ISO as low as possible (e.g., ISO 100 or 200) to reduce noise, relying on the flash to illuminate the scene.
When to Use Flash
Use flash in the following situations:
1. Low Light Conditions: Dusk, dawn, or indoor skate spots often lack sufficient light, making flash necessary to capture clear, detailed shots.
2. Backlit Scenes: When the skateboarder is backlit, use a flash to illuminate the subject and prevent them from appearing as a silhouette.
3. Adding Creative Effects: If you want to create dramatic lighting effects or emphasize motion with techniques like rear curtain sync, a flash is indispensable.
How to Use Flash
1. Off-Camera Flash: Position your flash off-camera for more dynamic lighting. This allows you to create side lighting, rim lighting, or other creative effects that give your image a three-dimensional look.
2. Angle and Distance: Start by placing the flash 45 degrees to the side of the skateboarder and about 6-10 feet away. Adjust the angle and distance based on the effect you want – closer for more intense light, further for softer light.
2. Angle and Distance: Start by placing the flash 45 degrees to the side of the skateboarder and about 6-10 feet away. Adjust the angle and distance based on the effect you want – closer for more intense light, further for softer light.
3. Balancing Flash with Ambient Light: To avoid an overly harsh look, balance the flash power with ambient light. This can be done by adjusting the flash power or changing your camera settings (e.g., slower shutter speed to let in more ambient light).
4. Rear Curtain Sync: For motion trails behind the skateboarder, use rear curtain sync. This setting triggers the flash at the end of the exposure, creating a trail behind the subject, which adds a sense of speed and movement.
Where to Place the Flash Units
1. Key Light Position: Place your main flash unit at a 45-degree angle to the skateboarder, either in front or slightly to the side. This creates a natural, directional light that highlights the subject.
2. Fill Light: If using a second flash, position it on the opposite side to fill in shadows. This flash should be set to a lower power than the key light to avoid flattening the image.
3. Backlighting: Position a flash behind the skateboarder to create a rim light, which helps separate them from the background and adds depth.
4. Overhead: For certain tricks, placing a flash overhead (on a light stand or held by an assistant) can help illuminate the skateboarder from above, emphasizing their height and the trick itself.
Flash photography can transform your skateboard action shots, adding a level of detail, drama, and professionalism that natural light alone may not offer. By carefully selecting your equipment, mastering the settings, and strategically placing your flash units, you can capture dynamic images that truly stand out. Experiment with different setups and techniques to find what works best for the particular skate spot and style of skateboarding you're photographing.
Getting in Position
Now, let's discuss the real art of skateboarding photography: getting into the right position. Skateboarding is fast-paced, and your timing must be impeccable to capture the perfect shot.
1. Study the Rider
Before a skateboarder takes off, watch their movements closely. Learn to anticipate when they'll perform a trick or manoeuvre. Familiarity with the skater's style will give you a significant advantage in capturing their best moments.
2. Choose the Right Angle
Position yourself at an angle that allows you to capture the skater's face, especially their eyes. The eyes convey the intensity and determination that drive skateboarders to push their limits. Shooting from a low angle can also make the skater appear more prominent against the sky or obstacles.
3. Consider Background and Composition
The background is just as important as the subject. Make sure it's uncluttered and complementary to the action. Look for leading lines or interesting textures to enhance the composition of your shot.
4. Panning Techniques
Panning is a technique that adds a sense of motion to your photos. As the skateboarder moves, follow their path with your camera while keeping them in focus. This creates a dynamic and visually engaging effect, where the skater is sharp while the background blurs.
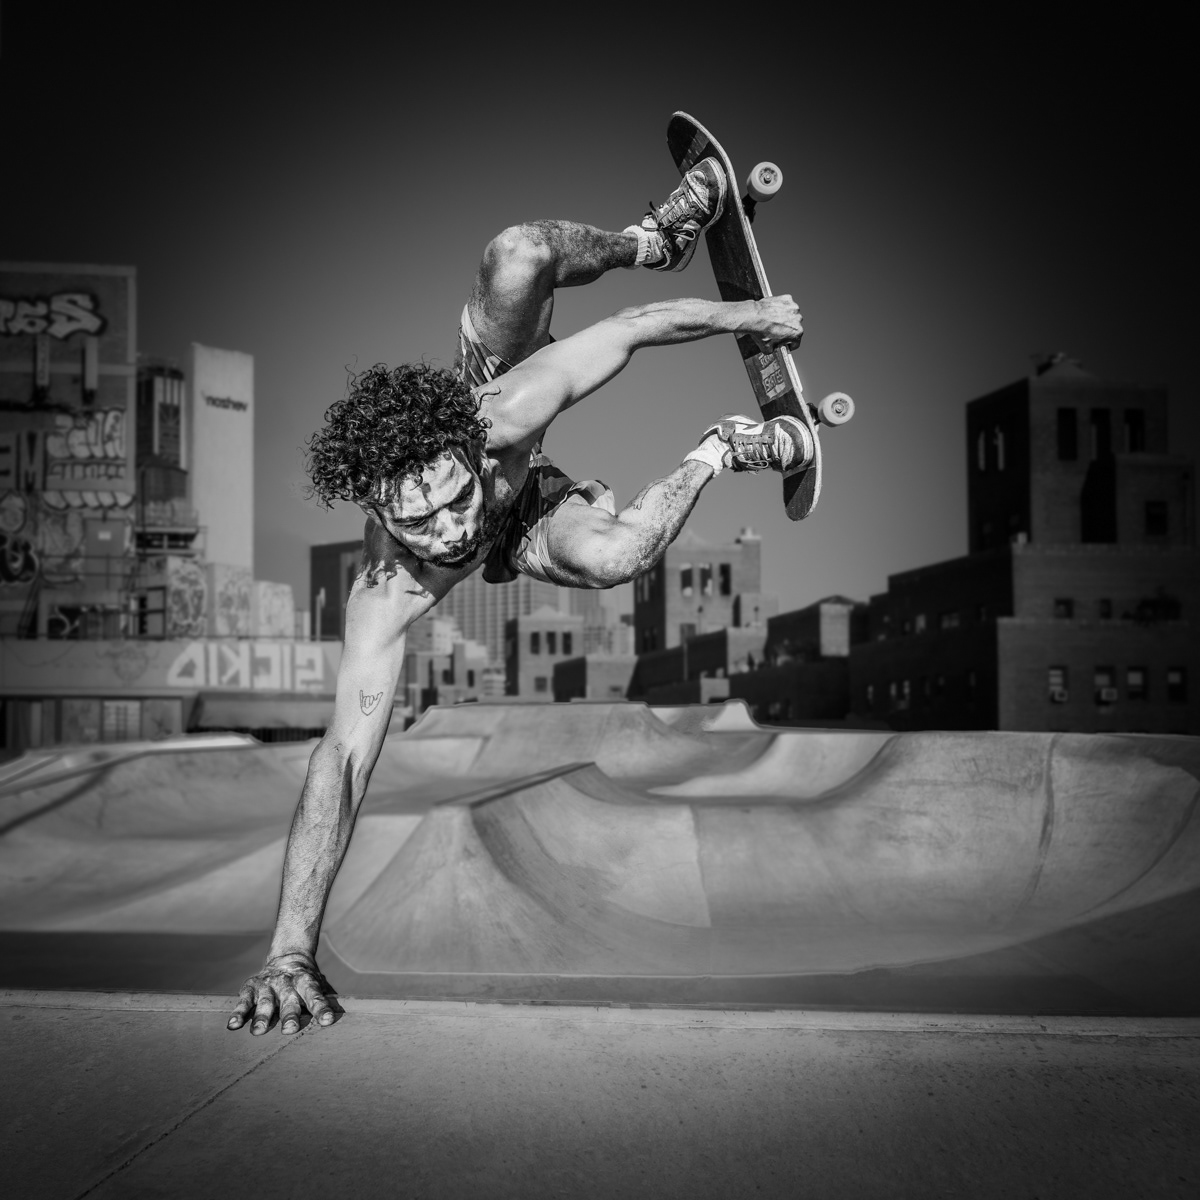
Settings: F8, 1/1000 sec, ISO 100 @15mm - 1 x Speed Light
Capturing the Moment
Now that you're in position and have your settings dialed in, it's time to capture the perfect action shot. Remember, skateboarding is all about those split-second moments of intensity, creativity, and skill.
1. Burst Mode
Skateboarding is unpredictable, and even the most seasoned skater doesn't land every trick perfectly. To maximize your chances of capturing the perfect shot, use burst mode. It allows your camera to take a rapid sequence of shots with a single press of the shutter button. Sorting through the images later ensures you don't miss that golden moment.
2. Focus and Timing
Timing is everything. As the skateboarder approaches your desired frame, half-press the shutter button to lock focus on the skater. Then, as they reach the most critical point of the trick or action, fully press the shutter to capture the image. This technique minimizes the delay between focus and capture, increasing your chances of getting a sharp shot.
3. Facial Expressions
Don't forget to capture the skater's facial expressions. The determination, joy, and sometimes fear are all part of the experience. Faces tell stories, and a close-up of the skater's expression can add depth to your shots.
Post-Processing and Fine-Tuning
Even the best photographers often require a bit of post-processing to bring out the full potential of their images.
1. Straighten and Crop
Ensure your horizons are level and consider cropping your images to enhance composition or to remove any distractions.
2. Adjust Exposure and Contrast
Fine-tune exposure, contrast, and brightness to make your subject pop. However, be cautious not to overdo it, as subtlety often works best.
3. Enhance Colors
Color correction and enhancing can make your images more vibrant and engaging. Adjust the saturation and vibrance to bring out the best in your shots.
4. Sharpening and Noise Reduction
Sharpen your images for clarity, but be mindful not to introduce noise. Noise reduction tools can help maintain the image's quality.
5. Experiment with Filters and Effects
Explore creative filters and effects to give your images a unique style. Just remember, subtlety is often the key here, too much and your photo may look artificial.
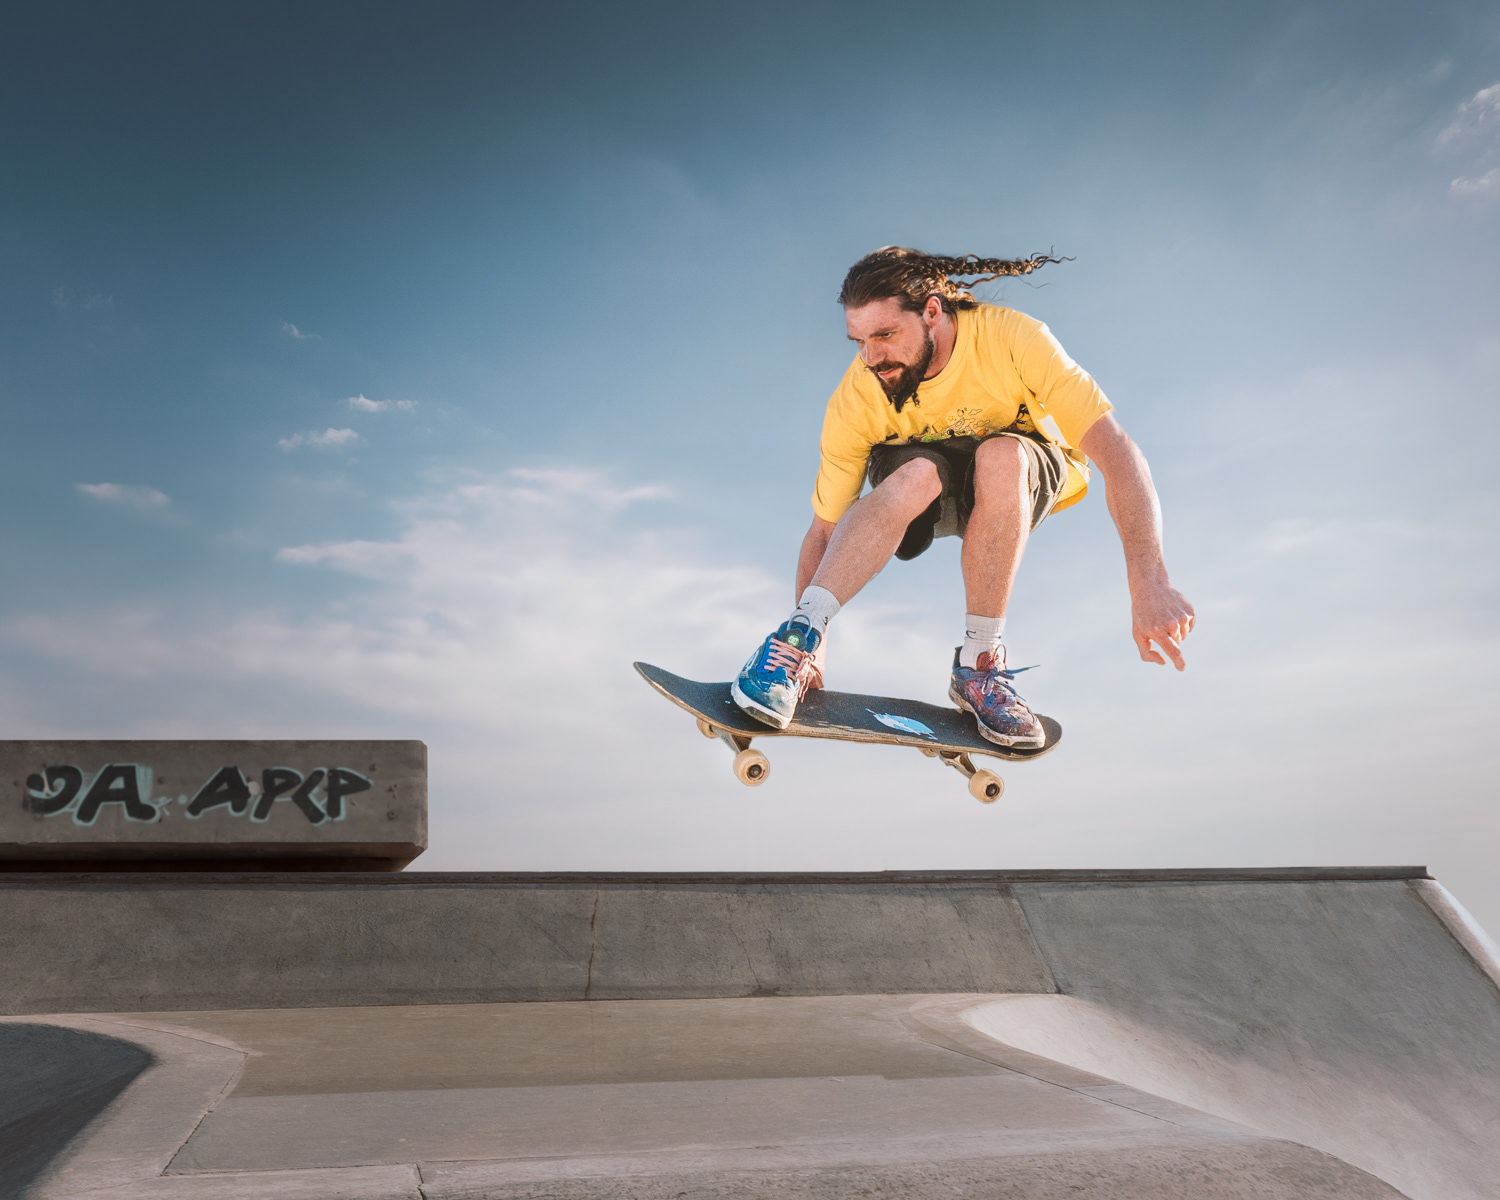
Settings: F8, 1/1000 sec, ISO 100 @14mm
Sharing Your Masterpiece
Once you've captured and fine-tuned the perfect skateboarding action shot, it's time to share your masterpiece with the world. Social media, photography communities, and even print can be great platforms for displaying your work.
1. Instagram and Hashtags
Instagram is a haven for visual artists. Use relevant hashtags like #skateboardingphotography and #actionshot to reach a broader audience. Engage with the skateboarding community to get noticed.
2. Photography Forums
Participate in online photography forums and communities. Share your work, ask for feedback, and learn from other photographers. It's a great way to refine your skills and gain exposure.
3. Print Your Work
Consider printing your best shots. An actual print can bring out the beauty of your image in ways that a screen can't. You can sell your prints or even exhibit them in local galleries.
Final Thoughts
Freezing the thrill of skateboarding in a photograph is a unique and exhilarating experience. It's not just about technique and gear; it's about understanding the culture and mindset of skateboarding. Immersing yourself in this world will enable you to capture moments that truly represent the heart and soul of the sport. So, grab your camera, hit the skate park, and get ready to capture the perfect skateboarding action shot – a testament to the passion and skill of those who ride the board.
Thank you, stay safe and happy shooting!
Martin
Want to learn more?
This topic and guide is very closely linked to my other guides, please check them out:
Want to see more images like this?
Looking for further advice and inspiration, head over to:
Like what you see and want any of my images as a print up to A3, please contact me?
If you have any questions, comments or feedback please reach out to me using the submission form below. I know these guides have been greatly received by many and I'm always happy to help out where I can.
Thank you!